The final cut
Presentation
The final cut (or boost), aka TFC, is a stand-alone (or VST) software that simulates, in real time, the interaction between loudspeakers and room. In real time means that you can hear the changes as the same time that you modify parameters. Preferably listen with headphones otherwise you will get two times a room effect !
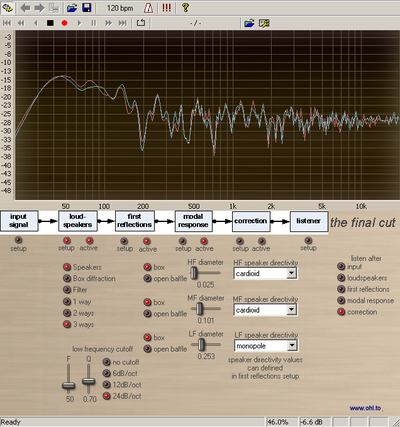
This simulation (a real auralization) includes :
– a signal generator with various test signals and wav file player
– simulation of the cutoff of speakers with adjustable frequency and slope (with the associated group-delay)
– choice between one, two or three ways with various crossover choices
– diffraction of the rectangular front-panel
– mutual coupling of two speakers at low frequencies
– first reflections of near walls with adjustable absorption coefficients
– the modal response of the room (only simple rectangular room and axial modes)
– possibility to do Digital Room Correction with FIR filtering from DRC and convolution
– or choose correction with parametric Eq
– change listener position and listen to variying soundfield
Parameters are numerous but software is easy to understand if you have some knowledge in electroacoustics.
Maybe during your listening sessions, you’ll find that the effects are more pronounced than in the real world. First, if you aren’t familiar with pink noise, note that this signal is the best to show any frequency anomaly. If you try same settings with music, the various effects will generally be less audible. Second point : in a room, your brain is able to dissociate, to a certain extend, the sound of the room itself from the direct sound of the speakers. So don’t blame me but tell me about your findings, I’ll certainly may have to improve some things.
This soft being also available as a VST, it can be used in other editing softwares or with many VST hosts (see tips and FAQ page).
For the moment, it is very new and still beta so please send your comments and wishes.
The final cut is free, and can be found at the downloads page. It works only on windows and maybe in linux through wine.
Install
No special installation is needed, just unzip the downloaded file anywhere and launch the_final_cut.exe. A new subdirectory called the_final_cut will then be created.
An error may be indicated with convolver, so move following files to a directory known in your windows path ie C:\Windows\System32\
libfftw3f-3.dll
libsndfile-1.dll
And because convolver will complain of a missing config file, just click on its filter/config and load it with default.wav.
It’s all done, now you can use The final cut.
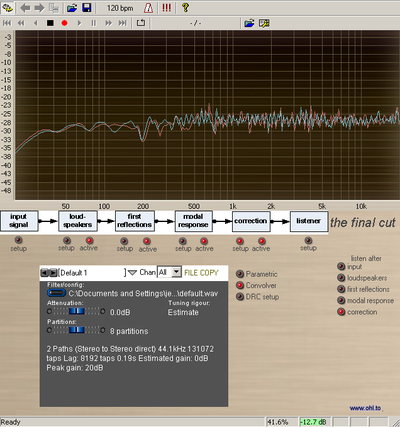
DRC
The DRC setup is available in the correction part. First click on "locate files" and choose any file in the directory where you have the_final_cut.exe, it’s just to get the path to all needed files.
After, use the "create sweep" button and just click on any key when the forefront DOS windows disappears and when the initial DOS windows asks for.
You may leave the working directory open in an explorer windows so you will see the different files being created by the various processes.
Please note that the "create sweep" process need only to be done once. Just keep the created files.
Now you may modify some room/speakers parameters to fit your needs.
Keep loudspeakers/first reflections/modal response active and click on the "record sweep" button, it will send the sweep.wav file though the actives processes and save a recorded.wav file.
After you can move on the DRC process that calculates the inverse curve "create IR". As before, click on any key of your keyboard when main DOS windows comes back. It may take between 2 and 4 minutes and you’ll end with a rps.wav file. To apply the correction, choose this rps.wav file in the Convolver "select filter/config". When you activate the correction through Convolver, you should get a near flat frequency response.
When you record, take care to avoid any overload (red blinking indication on bottom), otherwise you can edit sweep.bat and change the parameter just after the frequency, it’s 0.1 per default(-20dB), you can go down to 0.05 maybe.
While recording, only the left channel passes through the degradation stages (speakers/early reflexions/modal response), so right channel can be used as a reference with DRC.
Files created in the DRC process :
sweep.pcm and sweep.wav : test signals
inverse.pcm : inverted sweep used to calculate IR
recorded.wav and recorder.pcm : signals passed through degrading stages (recorded.wav is stereo with left passed through degrading stages and right channel is original, not degraded)
rs.pcm : measured impulse response (IR)
rtc.pcm : corrected response calculated by DRC
rps.pcm and rps.wav : correcting filter to be loaded in the convolver.
All .pcm files are 32bits mono IEEE float and all .wav files are 16bits stereo.
Now that you have quite a flat curve, just move the listener and see what happens. Do a manual parametric Eq and compare.
You can also play with dissymetry slider in "early reflections".
You can also load a filter done with another software, ie Room Eq Wizard and listen when you move the listener or other changes.
To change some parameters of DRC, you can edit drc.bat and change the fifth line :
– instead of flat.txt, you can use subultra.txt or any other target curve.
– for the DRC calculation, replace optimized.drc with another .drc file, see DRC documentation.
– I have added a tfc.drc file (change the line to : start drc –PSPointsFile=flat.txt tfc.drc).
This tfc.drc has decreased values of 0.8 for MP, EP, ISPE and RTWindow
exponent (instead of 1). This value doesn’t give an optimised
correction at one listener point but gives a better insensibility to
listener position moves (see a simulation here). But better do your own trials.
Other infos
Everything about DRC is here (great work !).
Get usefull infos about convolver here.
Some tips in my tips and FAQ page.
Here, in same conditions as image above, response after correction with DRC.
Apart DRC, there are many ways to get the impulse response, here is one :
1) generate the sweep with Voxengo Deconvolver (stereo, 45s)
2) read the file with the final cut (wav player) and record with recorder integrated in the the host
3) Use Voxengo Deconvolver with both the sweep and the recorded file
4) use the resulting calculated file in Adobe Audition and generate he inverted file with Aurora Inverse Filter plug-in. Record and keep this file
5) use this last file in Convolver
This is a way to get another correction to be compared.
Evolutions
– reduction of CPU load is needed (now it needs a PC with a 1.4Ghz min and 256MB of RAM)
– also tell me if your experience or measurements don’t agree with my simulation, I probably did some maths mistakes here or there !
– lot of things and suggestions from all of you